Setting up a Raspberry Pi Web Server
February 12, 2016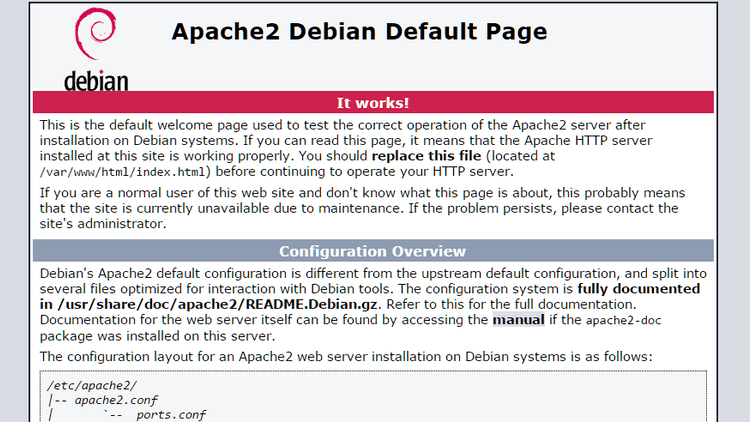
Ever since it's introduction early 2012, the Raspberry Pi has proven itself to be an extremely capable little machine. For less than $30, you get a credit card-sized computer capable of automating home systems, powering robots, or even serving as a basic desktop computer.
This tutorial however, focuses specifically on getting your Raspberry Pi set up to run as your very own web server. In addition, we'll cover how to set up Dynamic DNS records, so you can access your sites/files even when you're away from your home network without having to remember an always-changing IP address.
"That's cool and all...but what am I going to do with my own web server?"
Great question! The quick answer is: Whatever you want! To be more specific, you can:
- Set up your own, private Dropbox-style cloud storage for your personal files/videos/images
- Create a site that interfaces with your home security cameras and check them remotely
- Host your own low-traffic webpages
- Etc.
Beyond the web server-specific functions, a Pi with dynamic DNS set up can be used to:
Disclaimer: The Raspberry Pi is great as a lightweight web server for personal use and experimenting. However, if you are interested in hosting a heavily trafficked site like a blog, I'd highly recommend hosting your content on a third-party web host. In addition, most ISP's aren't particularly interested in letting their customers host their own web servers, and a self-hosted web server with a lot of external requests can raise some flags and even slow down your home network connection.
With all that out of the way, let's get started!
Step One: Set up your Pi
The first step in setting up any new Raspberry Pi is to format an SD card for installing the Raspbian OS on. If you purchased/your Pi came with a pre-formatted NOOBS SD card, you can skip these first few steps as your SD card already has Raspbian ready to go.
For those of you with brand new, unformatted cards, you'll want to follow raspberrypi.org's excellent guide to getting Raspbian installed on your SD card. For those of you looking to use your Pi as a dedicated web server, you can elect to install a Raspbian Lite image from the list of downloads. This will configure your Raspbian installation to run headless (without a GUI), which is a cut down version of the OS.
Once you've completed the Raspbian installation process, you can go ahead and plug your SD card into your Pi along with your HDMI, Ethernet and USB mouse/keyboard. Fiinally, add some USB power to boot it up for the first time!
Next go ahead and complete the Raspbian installation, making sure to enable SSH in the configuration process (great video tutorial available here).
NOTE: If you chose to install the full Raspbian OS and your first Raspberry Pi boot completes without any prompts, it will eventually end you on the GUI desktop. To ensure SSH is enabled from here, click "Menu" in the top left and navigate to "Preferences > Raspberry Pi Configuration". In the window that opens, switch to the "Interfaces" tab and make sure "SSH" is set to "enabled".
Step Two: Setting Up LAMP
LAMP stands for Linux, Apache, MySQL, and PHP. It is a term commonly used to refer to a software stack for development and deployment of web applications and web sites on servers.
For this step, you can choose to interact with your Pi directly using a USB mouse, keyboard, and monitor or SSH in via another computer on your network (my preferred method).
NOTE: This would be a perfect opportunity to set a static IP address for your web server, so you can always access it at the same local address. This can be done via your router's web interface.
To SSH, you'll need to determine the local IP address assigned to your Pi, which can easily be done by consulting your router's web interface (http://192.168.0.1 for Netgear routers) and inspecting "Attached Devices". Look for "raspberrypi" in the description column.
Once you know the LAN IP address assigned to your new server, enter the following command in the terminal on your other computer, making sure to replace the IP address accordingly:
You'll be asked for your root password (the one you set during the installation process, otherwise is "raspberry" by default).
OPTIONAL: If using the default password, you can change it by entering the following command after logging in with the default credentials:
passwd
OPTIONAL: By default, the full Raspbian image includes a number of extra features/libraries that most users won't need. You can run a script (follow the instructions here) to optimize and remove these unecessary features and speed up the boot time of your Pi. Note, this may take a while to run, so go grab a snack! If you chose to install Raspbian Lite, you can skip this step.
Now that you're connected to the Pi, you'll want to update your Raspbian package list and install any new versions as necessary:
sudo apt-get update
sudo apt-get upgrade
Next, install Apache:
sudo apt-get install apache2 -y
Once the Apache installation process has finished, you can go ahead and check to make sure your server is working by navigating to your Pi's IP address in a web browser (i.e. http://192.168.0.106).
If everything is configured correctly, you should see a page displaying the words "It works!".
If nothing shows up, try restarting the Apache service:
sudo service apache2 restart
The next step in the LAMP setup is to install MySQL, which is a powerful open-source Database Management System used to manage/save application data:
sudo apt-get install default-mysql-server php7.0-mysql -y
Once the MySQL installation is complete, it can be activated using the following command:
sudo mysql_secure_installation
You'll be asked for the root password you set during the installation process (you can change it here if you'd like), followed by a number of configuration questions. In most cases, you can simply answer "y" to all of these and proceed through the rest of the process.
Now that MySQL is installed and configured, we'll install PHP:
sudo apt-get install php7.0 libapache2-mod-php7.0 -y
Once the PHP installation is finished, you're ready to configure Apache to serve your pages, bypassing your ISP's restrictions on port 80.
Step Three: Configure Apache
Now that all parts of our LAMP stack are present, let's set up Apache to listen on port 5050 instead of the default 80.
This is done to bypass many ISP's blocking port 80 to prevent their customers from hosting their own web servers (shhh....) unless they upgrade to a business-tier service.
The first step is to modify the Apache configuration file:
sudo nano /etc/apache2/ports.conf
Change the following lines:
Listen 80
To:
Listen 5050
Exit the nano editor and save your changes by pressing 'Ctrl + X', 'y', and finally 'Enter'.
Restart Apache again to apply the changes:
sudo service apache2 reload
Confirm that your changes are working by navigating to your Pi's IP address in your browser again, only this time append ":5050" to the URL (i.e. http://192.168.0.106:5050).
Step 4: Dynamic DNS
The next step is to set up Dynamic DNS for a domain name of your choosing. By default, your ISP assigns your web server a random, public IP address (ex. 11.222.33.444). Unfortunately, in most cases they will frequently reassign this IP address, making it very difficult to maintain a reliable connection to your web server. Thankfully Dynamic DNS allows us to bypass this issue altogether by having your new web server regularly report and update it's own public IP address in your domain name's DNS record!
There are many excellent DNS providers, but for the sake of this tutorial, I'll be following the steps I took to configure my DNS for cloudflare.com. I recently switched to Cloudflare for my DNS services since they offer more features and DDoS protection than my previous provider. As a bonus, they offer all this in their free tier of service!
First though, if you don't already own a domain name you'd like to use, you'll need to purchase one. I recommend Namecheap. I've been using their services for years and have had a great experience. However, feel free to use whomever you'd like!
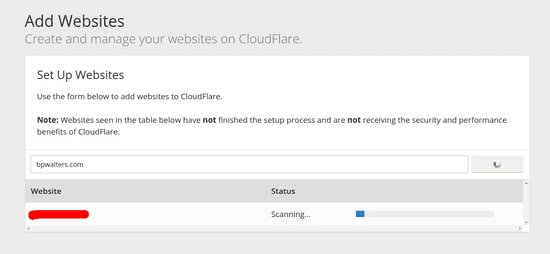
Once you've got a domain name ready to use, go ahead and create/login to your Cloudfare account. Next, enter your new domain name into the search field and let Cloudfare pull your domain records:
When the search is complete, click "Continue", confirm that all of your DNS records were successfully pulled and click "Continue" again.
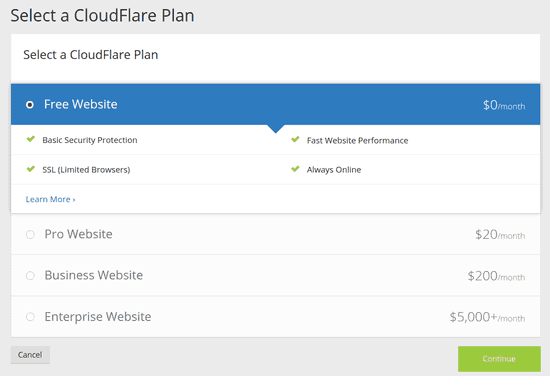
Next, you will be prompted to select what level of service you want to use. You can go ahead and select the "Free" tier:
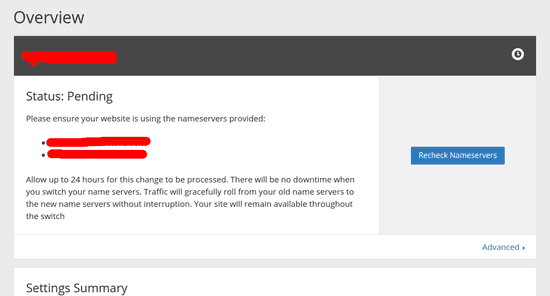
You should be redirected to your Cloudflare dashboard and see something like the following:
There will be two nameserver records displayed. These will need to be entered in your domain record in order to complete the transfer process.
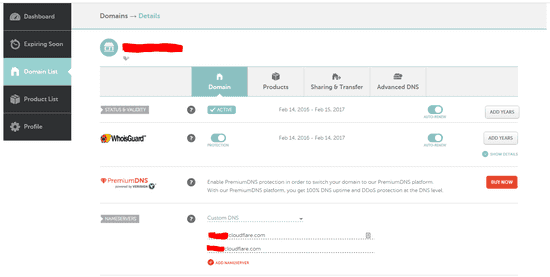
To do this, simply log into your Namecheap account, navigate to your dashboard, and click "Domain List" on the left-side menu. Click "Manage" on the domain for which you are transferring DNS control to Cloudflare, and enter the aforementioned nameserver records under the "Nameservers" section:
After updating your domain record with the Cloudflare-provided nameservers, it should only take an hour or so to complete the transfer (they say up to 48, but that's a generous estimate). Once it's done, you'll see the following on your Cloudflare dashboard:
Awesome! Your domain name record and DNS provider should now be configured and ready to accept DNS updates from your web server.
Step 5: DDNS Configuration on Apache
First, we'll need to install 'ddclient', a DDNS client for Apache on your web server. Run the following command:
sudo apt-get install ddclient
During the setup process, you'll be asked for some details. Feel free to enter whatever you'd like here, as we'll be changing most of it in a second anyways.
Now before we go any further, we need to patch our ddclient installation. By default, the Raspbian repository doesn't include an updated version of ddclient. Fortunately, we can update our install with the following commands (credit to Jens Segers for his awesome guide on updating ddclient):
sudo apt-get install ddclient libjson-any-perl
wget http://downloads.sourceforge.net/project/ddclient/ddclient/ddclient-3.8.3.tar.bz2
tar -jxvf ddclient-3.8.3.tar.bz2
cp -f ddclient-3.8.3/ddclient /usr/sbin/ddclient
As Jens notes in his guide, newer versions of ddclient have moved the location of the configuration file, so we'll need to move the old configuration file:
mkdir /etc/ddclient
mv /etc/ddclient.conf /etc/ddclient
Next, we're going to update our 'ddclient.conf' to communicate with our new DNS profile on Cloudflare, but first need to get our Cloudflare API key.
This can be done by logging in to your account, going to "My Profile" (dropdown in the top right), and scrolling down to the "API Key" section:
Once you have your API key copied down, go ahead and enter the following command to open your ddclient configuration file for editing:
sudo nano /etc/ddclient.conf
You'll need to change to the following:
use=web, web=dyndns
protocol=cloudflare, \
server=www.cloudflare.com, \
zone=yourdomainnamehere, \
login=yourcloudflareloginemail, \
password=yourcloudflareapikey \
yourdomainnamehere
Exit the nano editor and save your changes by pressing 'Ctrl + X', 'y', and finally 'Enter'.
To test our configuration, and set the initial values, run:
sudo ddclient -daemon=0 -debug -verbose -noquiet
You should see a list of debug commands followed by a "SUCCESS" line reporting that your server's current IP was set on your DNS record.
Step 6: Port Forwarding Setup
The last step is to configure your home router to forward HTTP requests to port 5050. The steps for this will vary greatly depending on your brand and model of router, but for simplicity I'm going to run through the setup steps for my Netgear Nighthawk R6900.
First, open the admin page for your router again. As before, the IP address for your router can usually be found on the underside of the router itself, or a quick Google search of your router's brand/model. In my case, its http://192.168.0.1.
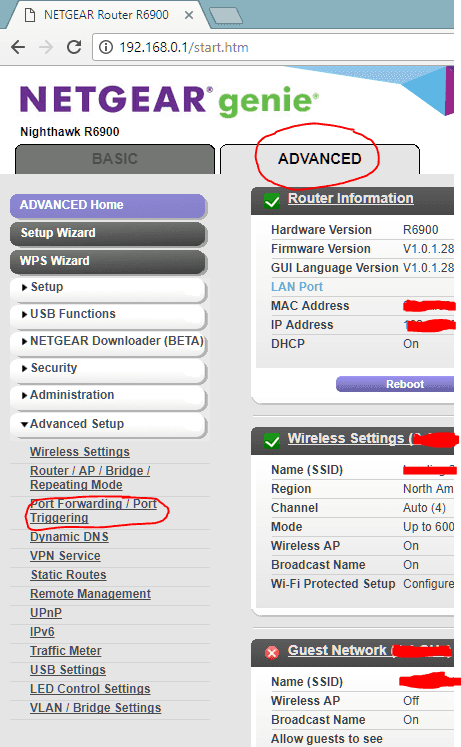
Within the Netgear interface, click on the "Advanced" tab, then under "Advanced Setup" on the left side menu click the heading to expand the options. You should see "Port Forwarding/Port Triggering" - click to open your port forwarding options.
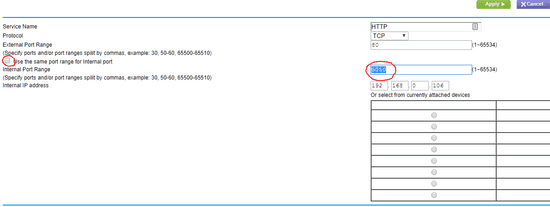
On the left side of the screen there should be a "Service Name" dropdown with a few options - select "HTTP" here. Next, in the "Server IP Address" box, enter the IP address of your Pi server and click "Add". This should map the HTTP port to the internal IP address of your Pi. Finally, we need to edit the newly created configuration to have it map external port 80 to internal port 5050 (the port we configured your Apache server to listen on).
And that's it! Congratulations - you should now have a fully functional, publicly available Raspberry Pi web server!
Let's quick recap what we've accomplished.
- First, we installed all of the necessary web server components on your Raspberry Pi.
- Second we configured our Apache web server to listen for requests on port 5050 instead of the default 80.
- Third, we set up Dynamic DNS on our newly registered domain name with Cloudflare.
- Fourth, we set up DDNS on Apache to regularly update our Cloudflare DNS record with our web server's randomly assigned public IP address.
- Finally, we set up a port forwarding rule on our router to forward external port 80 HTTP requests to port 5050 of our Pi server.
NOTE: It may take a few minutes to a few hours for your DNS record to update and correctly resolve requests to your domain name to the public IP of your web server, so be patient.


